How to Set Up Autopay in PhonePe
In today’s fast-paced world, managing recurring payments can be a hassle. Remembering due dates for bills, subscriptions, and other payments often leads to missed deadlines and late fees.
Thankfully, PhonePe offers a convenient solution with its AutoPay feature. This feature allows you to automate your payments, ensuring they are made on time without any manual intervention.
Whether it’s your electricity bill, mobile recharge, or a subscription service, AutoPay takes care of it all. Setting up AutoPay in PhonePe is simple and can be done in just a few steps.
In this article, we will guide you through setting up AutoPay in PhonePe, customizing your payment schedules, and managing your AutoPay settings to ensure a seamless and stress-free payment experience.
Say goodbye to the inconvenience of manual payments and hello to the ease of automated transactions with PhonePe’s AutoPay.
How to Set Up AutoPay in PhonePe
AutoPay is a feature that allows you to automate payments for various services on PhonePe.
Once enabled, AutoPay ensures that your bills are paid automatically on the due date, eliminating the need to remember payment dates and manually process transactions.

This feature is particularly useful for managing recurring payments such as utility bills, subscriptions, and investments.
Setting up AutoPay in PhonePe is a straightforward process. Follow these steps to enable AutoPay for your bills and subscriptions:
Step 1: Open PhonePe
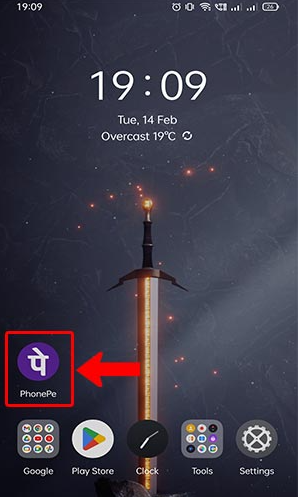
Launch the PhonePe App on your smartphone. Ensure that you have a registered account and are logged in.
Step 2: Access AutoPay Settings
- Tap your Profile Picture on the PhonePe app home screen.
- Navigate to the Payment Management section.
- Tap on AutoPay Settings.
Step 3: Select the Bill or Service
- Tap Select All under the Recharge & Pay Bills section on your PhonePe app home screen.
- Select the relevant bill or service you want to set up AutoPay. This could include Electricity Bill Payments, Gas Bill Payments, Water Bill Payments, Broadband Bill Payments, Postpaid Mobile Bill Payments, and Subscriptions.
Step 4: Enter Bill Details
- Enter the required Bill Details. If you’ve previously paid the bill on PhonePe, you can also select the bill from the Recent Accounts section.
- Tap Confirm.
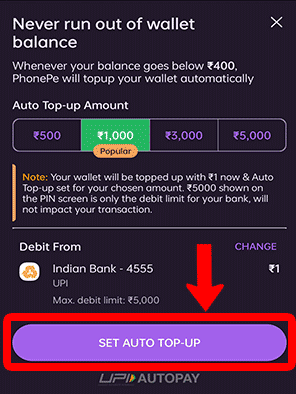
Step 5: Set Up AutoPay
- Tap Set up AutoPay and then tap Continue.
- Select the Bank Account or Card from which the payments will be made.
- Tap Pay.
- Enter your UPI PIN to authorize the payment.
- Tap Done to complete the setup.
Customizing AutoPay Settings
PhonePe provides flexibility in customizing your AutoPay settings according to your needs. You can:
- Set Payment Amount: Determine the desired amount you want to set for AutoPay.
- Customize Schedule: Choose the frequency and specific dates for each payment.
- Set Thresholds: Specify a threshold amount for enabling AutoPay for a specific biller.
Managing AutoPay Settings
You can easily manage your AutoPay settings within the PhonePe app. To do so:
- Tap your Profile Picture on the PhonePe app home screen.
- Tap AutoPay under the Payments Management section.
- Select the relevant AutoPay.
- Make the necessary changes or tap Remove AutoPay to disable the payment for that bill.
Pausing or Disabling AutoPay
If you want to temporarily pause or disable AutoPay for a particular bill:
- Tap your Profile Picture on the PhonePe app home screen.
- Tap AutoPay under the Payments Management section.
- Select the relevant AutoPay.
- Tap Pause or Remove AutoPay.
Receiving Notifications
PhonePe sends notifications for successful AutoPay transactions. You will receive updates regarding the payment amount, date, and transaction confirmation.
Ensuring Security
PhonePe follows strict security measures to protect your payment information. They use encryption and secure protocols to safeguard your data, ensuring a secure AutoPay experience.
Setting Up AutoPay for Mutual Fund SIPs
PhonePe also offers UPI-based AutoPay functionality for mutual fund Systematic Investment Plans (SIPs). Here’s how to set it up:
- Click on the Start a SIP icon in the investment section on the PhonePe app homepage.
- Choose your investment style (conservative, moderate, or aggressive) and investment duration (short, medium, or long term).
- Select a fund and enter the monthly investment amount.
- Enter your UPI PIN to set up regular investments.
| Step | Action |
|---|---|
| 1 | Click on the Start a SIP icon |
| 2 | Choose investment style and duration |
| 3 | Select a fund and enter the investment amount |
| 4 | Enter UPI PIN to complete setup |
Troubleshooting AutoPay Issues
If you encounter issues while setting up or managing AutoPay, here are some common troubleshooting steps:
AutoPay Setup Fails
If your AutoPay setup fails, it could be due to various factors. Try the following:
- Confirm that your bank supports auto payments via UPI and eNACH.
- Ensure that your bank account or card is linked correctly.
- Retry the setup after some time.
- If the issue persists, open a ticket for the relevant AutoPay request by tapping your Profile Picture and selecting Contact Customer Support.
Modifying AutoPay Details
To modify the investment date or amount for an SIP:
- Tap Wealth at the bottom of your PhonePe app home screen.
- Tap My Portfolio at the top of the screen.
- Tap My SIPs.
- Select the relevant SIP and tap Modify.
- Change the investment amount or set a new date and tap Continue.
- Tap Confirm in the pop-up.
| Step | Action |
|---|---|
| 1 | Tap Wealth at the bottom of the home screen |
| 2 | Tap My Portfolio |
| 3 | Tap My SIPs |
| 4 | Select the relevant SIP and tap Modify |
| 5 | Change the amount or date and tap Continue |
| 6 | Tap Confirm |
Frequently Asked Questions
Can I set up AutoPay for all types of bills and payments?
Yes, PhonePe allows you to set up AutoPay for various bills such as mobile recharges, electricity bills, DTH subscriptions, and more.
Is it necessary to link a bank account or card for AutoPay?
Yes, you need to link a valid bank account or credit/debit card to enable AutoPay. This ensures seamless and timely transactions.
Can I customize the AutoPay schedule for each bill?
PhonePe provides the flexibility to customize the AutoPay schedule for individual bills. You can choose the frequency and specific dates for each payment.
How can I manage or modify my AutoPay settings?
You can easily manage your AutoPay settings within the PhonePe app. Navigate to the Wallet section, select AutoPay, and make the necessary changes.
What if I want to temporarily pause or disable AutoPay for a particular bill?
PhonePe allows you to pause or disable AutoPay for specific bills whenever needed. Simply access the AutoPay settings and disable the payment for that bill.
Will I receive notifications for AutoPay transactions?
Yes, PhonePe sends notifications for successful AutoPay transactions. You will receive updates regarding the payment amount, date, and transaction confirmation.
How can I ensure the security of my payment information for AutoPay?
PhonePe follows strict security measures to protect your payment information. They use encryption and secure protocols to safeguard your data, ensuring a secure AutoPay experience.
Conclusion
Setting up AutoPay in PhonePe is a simple and effective way to manage your recurring payments. Following the steps outlined in this guide, you can automate your bill payments, ensuring timely transactions and peace of mind.
Whether it’s utility bills, subscriptions, or investments, AutoPay in PhonePe offers a convenient solution to streamline your financial management.
With customization options and robust security measures, PhonePe’s AutoPay feature is designed to meet your needs and enhance your payment experience.


