How to Download PhonePe Statement
Managing your finances is crucial; keeping track of your transactions can help you stay on top of your spending.
If you use PhonePe, one of India’s leading digital payment platforms, you might want to download your PhonePe statement to review your transaction history.
This statement provides a detailed record of all your transactions, including UPI payments, wallet transactions, and other financial activities.
Whether you need it for personal record-keeping, budgeting, or reconciling your accounts, downloading your PhonePe statement is straightforward.
In this article, we will guide you step-by-step on downloading your PhonePe statement, ensuring you have all the necessary information at your fingertips.
From accessing the PhonePe app to requesting and receiving your statement via email, we will cover everything you need to know to manage your financial records efficiently.
How to Download PhonePe Statement
| Scenario | Steps |
|---|---|
| Downloading UPI Transaction Statement | 1. Open PhonePe app 2. Tap “History” tab 3. Tap “Download Statement“ 4. Select months or financial year 5. Ensure email address is verified 6. Receive PDF statement via email |
| Downloading Wallet Statement | 1. Open PhonePe app 2. Tap “Wallet” tab 3. Tap “Request Statement“ 4. Enter email address 5. Receive PDF statement via email |
| Downloading Transaction Report (for Merchants) | 1. Open PhonePe Business app 2. Log in with mobile number 3. Enter OTP 4. Click “Transactions” > “Reports“ 5. Select date range and filters 6. Click “Generate Report“ |
| Downloading Settlement Report (for Merchants) | 1. Open PhonePe Business app 2. Tap “History” > “Settlements“ 3. Select date 4. Tap “Yes” to download report |
What are PhonePe Statements
A PhonePe statement is a detailed record of all transactions made through the PhonePe app, including UPI transactions, wallet transactions, and other payment modes.
It serves as a valuable financial record, helping you keep track of your expenses, monitor your spending habits, and reconcile your accounts.
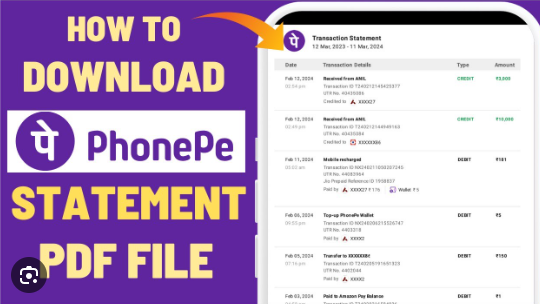
The PhonePe statement typically includes the following information:
- Transaction Date: The date on which the transaction occurred.
- Transaction Amount: The amount involved in the transaction.
- Transaction Status: Whether the transaction was successful, pending, or failed.
- Merchant ID: The unique identifier for the merchant or business involved in the transaction.
- Consumer Phone Number: Your registered phone number linked to your PhonePe account.
- Provider Reference ID: A unique reference number assigned by PhonePe for each transaction.
- Merchant Reference ID: The reference number generated by the merchant’s system for the transaction.
- Instrument Used: The payment mode used for the transaction (e.g., UPI, debit card, credit card, wallet).
- UTR: Unique Transaction Reference number for UPI transactions.
- Cashback: Any cashback or rewards earned on the transaction.
Downloading PhonePe Statement for UPI Transactions
One of the primary features of PhonePe is its UPI (Unified Payments Interface) functionality, which allows you to send and receive money directly from your bank account.
Here’s how you can download your PhonePe statement for UPI transactions:
- Open the PhonePe app on your mobile device.
- Tap on the “History” tab at the bottom of the screen.
- You’ll see a list of all your recent transactions, including UPI transactions.
- To download your PhonePe statement, tap on the “Download Statement” button located at the top left of the screen.
- Select the months or financial year for which you want the statement.
- Ensure that you have added and verified your email address before requesting the statement.
- You’ll receive a confirmation message that your PhonePe statement has been requested.
- Within a few minutes, you should receive an email from PhonePe with your statement attached as a PDF file.
Downloading PhonePe Statement for Wallet Transactions
In addition to UPI transactions, PhonePe offers a wallet feature allowing you to store and transfer funds within the app.
If you’ve been using the PhonePe wallet, you can download a separate statement for your wallet transactions. Here’s how:
- Open the PhonePe app and tap on the “Wallet” tab.
- Tap on the “Request Statement” button.
- Enter your registered email address and tap “Submit“.
- You’ll receive a confirmation message that your wallet statement has been requested.
- Within a few minutes, you should receive an email from PhonePe with your wallet statement attached as a PDF file.
Downloading PhonePe Statement for Merchants
If you’re a merchant using the PhonePe Business app, you can download transaction reports and settlement reports directly from the app. Here’s how:
- Open the PhonePe Business app and log in with your registered mobile number.
- Enter the OTP (One-Time Password) sent to your registered mobile number.
- Click on “Transactions” in the left panel.
- Click on “Reports“.
- Under “Generate Transactions Report“, select the date range for which you want to download the transaction report.
- Tick the “Status” of the payments and “Instrument” used to make the payments.
- Click “Generate Report” to download the transaction report.
To download a settlement report, follow these steps:
- Tap “History” at the bottom right of the PhonePe Business app home screen.
- Tap “Settlements” in the left panel.
- Select the date for which you want to download the settlement report.
- Tap “Yes” on the pop-up asking if you want to download the settlement report.
Your transaction report and settlement report will be downloaded to your device.
Filtering Transactions
The PhonePe app provides several filters to help you find specific transactions. Here are some of the filters you can use:
- Merchant ID: By default, transactions across all brands and GSTs are visible. However, you can choose a particular MID (Merchant ID) from the top right corner to access transactions for the chosen MID.
- Time Period: By default, the merchant can see transactions made during the current week. You can change the time period by clicking on the calendar in the top right corner to select the date range.
- Status Specific: The status of any transaction can be one of these three – Pending, Completed, or Failed. To get a list of transactions classified by their status, click on the filter symbol at the left of the calendar. From the drop-down, click on Status. The tab will expand where you can select the required items. Post that, click the “Apply” button.
- Consumer-Specific: You can search for transactions of a particular consumer by entering the consumer’s phone number in the box labeled “Mobile Number”.
- Store Specific: You can search for transactions done in any store by entering the Store ID in the box labeled “Store ID”.
- Terminal Specific: You can search for transactions done on any terminal by entering the Terminal ID in the box labeled “Terminal ID”.
- Instrument Specific: To get a list of transactions classified by the instrument used, click on the filter symbol at the left of the calendar. From the drop-down, click on Instrument. The tab will expand where you can select the required items. Post that, click the “Apply” button.
Generating Reports
In the PhonePe Business app, you can generate detailed reports of your transactions. Here’s how:
- Open the PhonePe Business app and log in with your registered mobile number.
- Enter the OTP sent to your registered mobile number.
- Click on “Transactions” in the left panel.
- Click on “Reports“.
- Under “Generate Transactions Report“, select the date range for which you want to generate the report.
- Apply filters based on Merchant ID, Status (Pending, Completed, Failed), and Instrument (Wallet, UPI, Debit Card, Credit Card).
- Click “Generate Report” to download the report.
Handling Escalations
The PhonePe Business app also allows you to handle customer escalations. Here’s how:
- Open the PhonePe Business app and log in with your registered mobile number.
- Enter the OTP sent to your registered mobile number.
- Click on “Escalations” in the left panel.
- All customer escalations will appear here. These are cases where customer inputs are required.
- Click on any customer escalation row to view the transaction details.
- Scroll to the bottom of the page to take action on the escalation.
Bulk Escalations
You can use the bulk escalations feature to handle multiple escalations at once. Here’s how:
- Open the PhonePe Business app and log in with your registered mobile number.
- Enter the OTP sent to your registered mobile number.
- Click on “Bulk Escalations” in the left panel.
- All customer escalations can be exported in a sheet.
- Once the relevant validations are done, the file can be uploaded to this tab using the Import option, where the resolution will be captured.
- Note: The file has to be in .csv format. Also, all refunds must be processed before uploading the file in this section for resolution.
Frequently Asked Questions
Here are some frequently asked questions related to downloading PhonePe statements:
Q: How far back can I download my PhonePe statement?
A: You can typically download your PhonePe statement for the past 6 months. However, this may vary depending on your account activity and the amount of data stored.
Q: Can I download a PhonePe statement for a specific date range?
A: Yes, when requesting your PhonePe statement, you can select a custom date range to download transactions for a specific period.
Q: How often should I download my PhonePe statement?
A: It’s generally recommended to download your PhonePe statement regularly, such as monthly or quarterly, to keep track of your transactions and reconcile your accounts.
Q: Can I download my PhonePe statement directly from the app?
A: No, you cannot download your PhonePe statement directly from the app. You need to request it, and it will be sent to your registered email address.
Q: Is there a limit to the number of PhonePe statements I can download?
A: There is no specific limit mentioned by PhonePe on the number of statements you can download. However, it’s advisable to download and store your statements regularly to avoid any potential issues.
Conclusion
Downloading your PhonePe statement is a straightforward process that can be accomplished in just a few steps.
Whether you’re a regular user or a merchant, having access to your transaction history is crucial for maintaining financial records and reconciling accounts.
Following the steps outlined in this article, you can easily download your PhonePe statement for UPI, wallet, and merchant transactions.
Remember to regularly download and store your statements for future reference and to keep track of your financial activities.

